Drawing
All drawing happens inside the draw callback. The window has already cleared to the background color by the time draw runs, so you just paint on top.
Color
setColor sets the color used by every shape and by text until you change it. The alpha argument is optional and defaults to fully opaque. You can pass three or four bytes, or a single Color written however reads best: by name (setColor(orange)), from bytes (setColor(rgb(255, 120, 60)), with rgba when you want the alpha too), from a hex string (setColor(color("#ff7a3c"))), or as a gray level (setColor(gray(128))). The window background takes a Color the same way. withAlpha gives back a color with a different alpha, and lerp blends two colors.
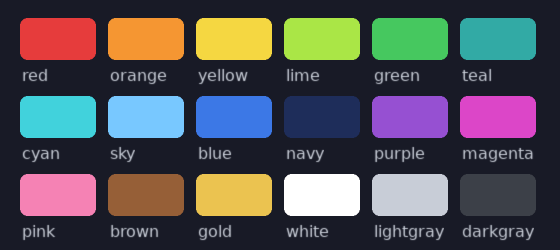
The named palette covers enough for quick sketches and HUDs.
setBackgroundColor changes the color the window clears to each frame.
Transforms
Every shape, image and bit of text you draw goes through the current transform, so instead of working out rotated or scaled coordinates yourself you move the coordinate system and draw at simple positions. translate shifts the origin, rotate turns it by an angle in radians, scale stretches it, and shear slants it. push and pop save and restore the whole transform so a change stays local. origin resets back to no transform.
push and pop nest, which is what makes it easy to build a thing out of parts that each have their own position and spin. The picture below is a little solar system: each planet is a push, translate, rotate, draw, pop, and each moon is another push inside its planet's.
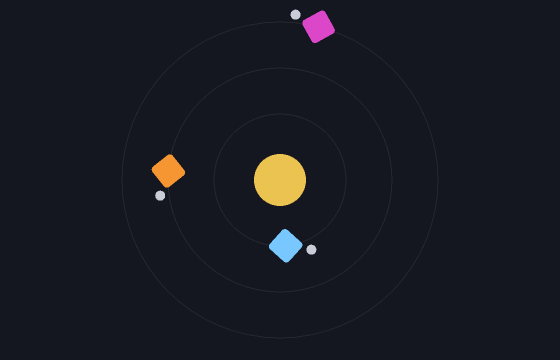
n2d.draw = proc(nim2d: Nim2d) =
  nim2d.push()
  nim2d.translate(400, 300)   # move to the center
  nim2d.rotate(angle)         # everything below is rotated
  nim2d.setColor(255, 200, 90)
  nim2d.rectangle(-40, -40, 80, 80, true)   # drawn around the new origin
  nim2d.pop()                 # back to where we were
For the common case of drawing a few things under a transform and then putting it back, transformed wraps a push and pop around a block: nim2d.transformed(move = vec2(x, y), angle = a, zoom = 2.0): ... runs the block translated, turned and scaled, then restores. The later arguments can be left off, so transformed(move = vec2(x, y)): ... is enough when nothing rotates. In the same spirit, withColor, withFont, withBlend and withCanvas each set one piece of state for the duration of a block and put it back afterward, so you never have to remember to reset it.
The transform resets to the identity at the start of every frame, so you always begin draw in plain screen coordinates.
Shapes
There is a small set of shape calls. Each one takes a filled flag that defaults to false, so by default you get an outline and with true you get a solid fill.
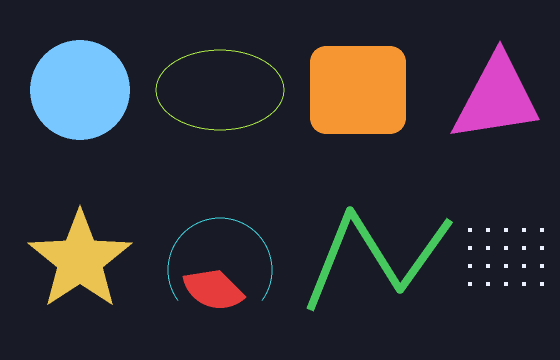
nim2d.circle(x, y, radius, filled = true)                           # (1)!
nim2d.ellipse(x, y, radiusX, radiusY, filled = true)                # (2)!
nim2d.rectangle(x, y, width, height, filled = true)                 # (3)!
nim2d.rectangle(x, y, width, height, filled = true, roundness = 12) # (4)!
nim2d.triangle(x1, y1, x2, y2, x3, y3, filled = true)               # (5)!
nim2d.polygon([x0, x1, x2], [y0, y1, y2], filled = true)            # (6)!
nim2d.line(@[(x0, y0), (x1, y1), (x2, y2)], width = 2)              # (7)!
nim2d.points(@[(x0, y0), (x1, y1)], size = 3)                       # (8)!
- A circle at a center point with a radius.
- An ellipse with separate x and y radii.
- A rectangle from its top-left corner, given a width and height.
- The same rectangle with its corners rounded.
- A triangle from its three corner points.
- A polygon from matching arrays of x and y coordinates.
- A connected line through a list of points.
- Single points at a given size.
arc draws part of a circle outline between two angles, and pie does the same as a filled wedge. Angles are in radians, measured clockwise from the right because y points down.
nim2d.arc(x, y, radius, startAngle, endAngle)
nim2d.pie(x, y, radius, startAngle, endAngle, filled = true)
Curved shapes take an optional segments count if you want them smoother or cheaper. The fill for polygon works for any simple outline. Concave shapes are split into triangles by ear clipping, so the star above fills correctly, not just convex ones.
Blend modes
setBlendMode controls how what you draw mixes with what is already there. The default is normal alpha blending. Passing "add" makes overlapping colors brighter, which is what you want for glow, fire and sparks. "multiply" darkens. Passing anything else turns blending off.
The same modes exist as the BlendMode enum, bmAlpha, bmAdd, bmMod and bmNone, which is what withBlend takes to set a mode for one block and put the old one back.
Images
Load an image once, usually before the loop or in load, and draw it many times.
A note on paths. The asset loaders, newImage, newFont and newSource, open files relative to the process working directory, which is wherever the program was started from, not necessarily where the executable is. The examples build their paths with getAppDir() from std/os, which is the executable's directory, and that is a good habit for anything you ship.
draw takes a position and a few optional arguments for rotation, scale and origin. The angle is in radians. The scale is separate for x and y. The origin is the point inside the image that sits at the position you gave and that rotation turns around, so passing half the width and height spins the image about its center.
let (w, h) = sprite.getDimensions                                   # (1)!
sprite.draw(nim2d, x, y, angle, 0.5, 0.5, w.float / 2, h.float / 2) # (2)!
- Read the image's pixel size.
- Draw it at x, y, turned by the angle, at half size, spinning about its center.
You can tint an image with setColorMod and fade it with setAlphaMod. There are also getWidth, getHeight and getDimensions. The flipH and flipV arguments of draw mirror the image, and destroy frees a texture early if you are churning through many of them.
By default an image is sampled smoothly, which is right for photos and high-resolution art but blurs pixel art when you scale it up. Call setFilter(filNearest) for sharp, blocky sampling that keeps pixel art crisp, or setFilter(filLinear) to go back. setWrap controls what happens when texcoords run outside the image, which comes up when you draw a quad larger than the texture: wrapClamp holds the edge pixel (the default), wrapRepeat tiles the image, and wrapMirror tiles it flipping every other copy. Both settings apply to canvases as well. Pass mipmaps = true to newImage to build a mipmap chain, which stops a texture from shimmering when it is drawn much smaller than its native size.
Quads
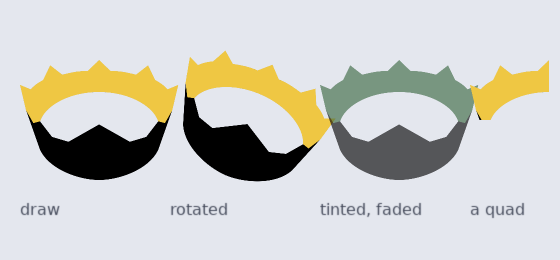
A quad is a rectangle inside a texture, which is how you draw one frame out of a sprite sheet. Make one with newQuad, giving the region and the texture's full size, then pass it to draw. The rightmost crown in the picture above is a quad cropping the top-left quarter of the image.
let frame = newQuad(64, 0, 64, 64, sheet.getWidth.float, sheet.getHeight.float) # (1)!
sheet.draw(nim2d, frame, x, y) # (2)!
- A 64 by 64 region at x 64, y 0, given the sheet's full size.
- Draw just that region of the sheet at x, y.
Pixel data
Most of the time you load images from files, but you can also build one in memory a pixel at a time. An ImageData is a buffer of RGBA bytes on the CPU. Make one blank, filled with a color, or loaded from a file, read and write single pixels with getPixel and setPixel, and use mapPixel to set every pixel from its position. When it is ready, newImage uploads it to a drawable image, and encode saves it to a PNG.
let data = newImageData(64, 64)
data.mapPixel(proc(x, y: int32, c: Color): Color =
  (uint8(x * 4), uint8(y * 4), 128'u8, 255'u8))

let tex = n2d.newImage(data)         # upload to the GPU
data.encode("gradient.png")          # or save it to disk

n2d.draw = proc(nim2d: Nim2d) =
  tex.draw(nim2d, 100, 100, 0, 4, 4)
Pixels are Color values like everywhere else, so getPixel hands back the four bytes and setPixel takes them. Reading or writing outside the image raises. There are getWidth, getHeight and getDimensions as well. The noise field on the math page is an ImageData filled by mapPixel and uploaded this way.
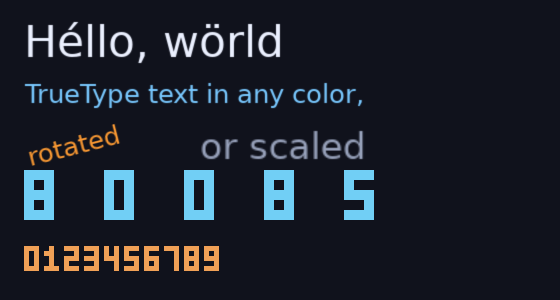
Text
Load a font and draw with it. The usual path is a TrueType font: newFont("font.ttf", 24), then setFont and print. print draws in the current color with optional rotation and scale, and input is UTF-8, so accented characters and other scripts work without any extra steps.
let font = newFont("font.ttf", 28)

n2d.draw = proc(nim2d: Nim2d) =
  nim2d.setFont(font)
  nim2d.setColor(230, 240, 255)
  nim2d.print("Héllo!", 40, 40)
print also takes an optional angle and scale. A font can tell you its getAscent, getDescent and getHeight, and getSize gives the pixel width and height a string would take, which is what you use to center or right-align text.
For pixel-art text there are bitmap fonts, like the digits in the lower half of the picture. A bitmap font is a glyph sheet where the characters sit in a row, separated by columns of the sheet's top-left pixel color. Load it with newImageFont, listing the characters in image order, and use it like any other font; it is sampled crisply, tinted by the current color, and scales to any size. The one difference is that print's rotation argument has no effect on a bitmap font, so wrap the call in the transform stack when you need rotated text.
let pixels = n2d.newImageFont("font.png", "ABCDEFGHIJKLMNOPQRSTUVWXYZ0123456789 ")
nim2d.setFont(pixels)
nim2d.print("SCORE 1234", 20, 20, 0, 4, 4)   # scaled up 4x
Sprite batches
When you draw the same texture many times, a sprite batch lets you build the whole lot up and draw it in one call. Make one with newSpriteBatch, add each copy with a position and optional rotation, scale and origin, then draw the batch. clear empties it, and setColor tints whatever you add after it. You can add a quad instead of the whole texture.
let batch = newSpriteBatch(tileset) # (1)!
batch.add(quad, x, y)               # (2)!
batch.add(x2, y2, angle)            # (3)!
batch.draw(nim2d)                   # (4)!
- A batch backed by one texture.
- Add one region of it at a position.
- Add the whole texture at another position, rotated.
- Draw the whole batch in one call.
The batch draws through the current transform, so you can translate or rotate before drawing it.
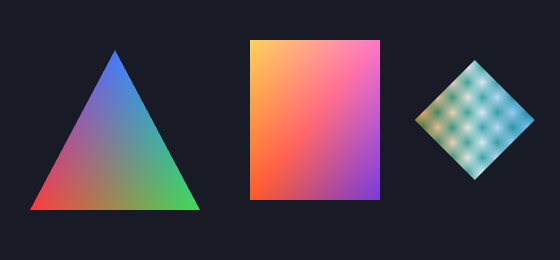
Meshes
A mesh is a list of vertices you control, each with a position, texture coordinates and a color, drawn as triangles, a fan, or a strip. Build vertices with meshVertex, make the mesh with newMesh, and draw it. Without a texture the vertex colors show through directly, which is how you make gradients like the triangle and square below. The diamond on the right is a textured mesh whose vertex colors tint the texture.
let red = (255'u8, 0'u8, 0'u8, 255'u8)
let green = (0'u8, 255'u8, 0'u8, 255'u8)
let blue = (0'u8, 0'u8, 255'u8, 255'u8)
let tri = newMesh(@[
  meshVertex(0, 0, color = red),
  meshVertex(100, 0, color = green),
  meshVertex(50, 90, color = blue),
])
tri.draw(nim2d, x, y)
Pass a texture to newMesh and give each vertex texture coordinates to draw a textured shape.
Particle systems
A particle system spawns lots of short-lived particles and animates them for you, which is how you get smoke, fire, sparks and so on. Make one with newParticleSystem, configure it with the setters, then call update every frame and draw to show it. With no texture the particles are colored squares, and with a texture they are textured quads.
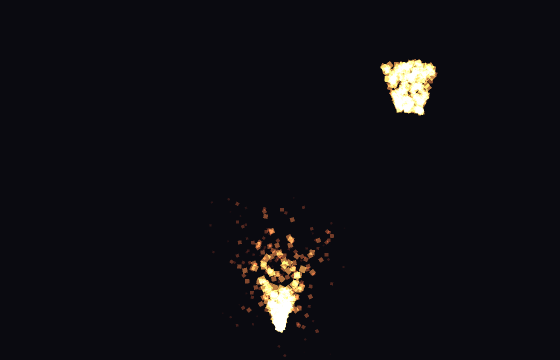
The setters cover the usual things. setEmissionRate is how many particles per second, setParticleLifetime is how long each one lives, setSpeed, setDirection and setSpread control how they fly out, setLinearAcceleration is a constant pull like gravity, and setSizes and setColors fade each particle from a start value to an end value over its life. setPosition moves the emitter. emit spawns a batch right now, which is handy for one-off bursts like the one at the top right of the picture. setSpin gives each particle a rotation over its life, stop and start pause and resume emission while the live particles play out, and count reports how many are alive.
let ps = newParticleSystem()
ps.setEmissionRate(200)
ps.setParticleLifetime(0.5, 1.2)
ps.setSpeed(100, 260)
ps.setDirection(-PI / 2)
ps.setSpread(0.6)
ps.setLinearAcceleration(0, 300)
ps.setSizes(8, 1)
ps.setColors((255'u8, 200'u8, 80'u8, 255'u8), (255'u8, 60'u8, 40'u8, 0'u8))

n2d.update = proc(nim2d: Nim2d, dt: float) =
  ps.setPosition(mouseX(), mouseY())
  ps.update(dt)

n2d.draw = proc(nim2d: Nim2d) =
  nim2d.setBlendMode("add")
  ps.draw(nim2d)
  nim2d.setBlendMode("blend")
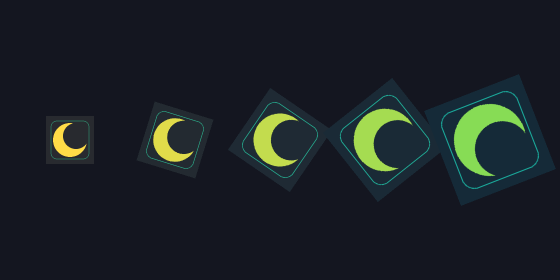
Canvas
A canvas is an off-screen image you draw into and then draw from, which is handy for building something once and reusing it, or for effects. Make one with newCanvas, switch the target to it with setCanvas, draw, then switch back to the screen by calling setCanvas with no argument. Do this inside draw.
The picture below is one canvas with a moon drawn into it, stamped five times with different rotation, scale and tint.
let canvas = n2d.newCanvas(256, 256)

n2d.draw = proc(nim2d: Nim2d) =
  nim2d.setCanvas(canvas)
  nim2d.clear(40, 40, 60)
  nim2d.setColor(255, 220, 90)
  nim2d.circle(128, 128, 60, true)
  nim2d.setCanvas()              # back to the screen
  canvas.draw(nim2d, 50, 50)     # draw the canvas like any image
clear fills the current target with a color, and called with no color it uses the background. withCanvas wraps the switch and the switch back around a block.
You can also go the other way and read a canvas back to the CPU. newImageData(canvas) downloads the pixels into an ImageData, which you can inspect or save to a PNG with encode. The renderer defers its work until the end of the frame, so the pixels are what the canvas held after the last completed frame: draw to the canvas in one frame, read it back in the next, in update. This is how the screenshots in these docs are made, and it works just as well for letting players save a picture of their creation.
n2d.update = proc(nim2d: Nim2d, dt: float) =
  if wantShot:
    nim2d.newImageData(canvas).encode("shot.png")
    wantShot = false
Scissor
setScissor clips drawing to a rectangle, so anything outside it is dropped. Call it again with no arguments to stop clipping. It applies to everything drawn while it's on. The rectangle is given in render-target pixels and does not go through the transform, so it stays put even when the things you draw inside it move.
nim2d.setScissor(100, 100, 200, 150)
nim2d.circle(200, 175, 120, true)   # only the part inside the rectangle shows
nim2d.setScissor()
Stencil
A scissor can only clip to a rectangle. To clip drawing to an arbitrary shape, create the window with newNim2d(..., stencil = true) and use stencil. You give it a proc that draws the mask shapes; those shapes are not drawn themselves, they only mark the region. After that, everything you draw shows up only inside the mask, until you call stencilStop.
On the left below, diagonal stripes are clipped to a star-shaped stencil mask. On the right, circles are clipped by a plain scissor rectangle.
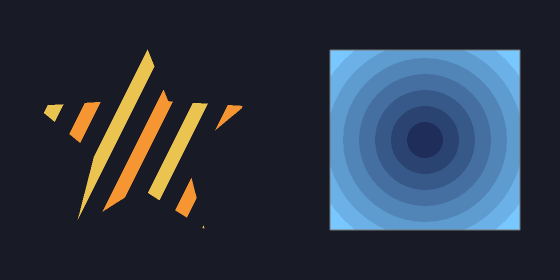
nim2d.stencil(proc(n: Nim2d) =
  n.circle(cx, cy, r, filled = true))   # the mask region
nim2d.draw(...)                          # appears only inside the circle
nim2d.stencilStop()                      # back to drawing everywhere
Anti-aliasing
Thick lines join cleanly on their own: when the width is more than a couple of pixels, the corners where segments meet are rounded so there are no gaps. For smoother edges everywhere, create the window with newNim2d(..., aa = 2), which renders the frame at twice the resolution and scales it down, an easy supersampled anti-aliasing that smooths shapes, lines and shaders alike at the cost of drawing more pixels.
Shaders
You can replace the fragment stage with your own shader for effects. While a shader is set, every draw runs your fragment function, and a uniform you fill with send lets you pass in things like time. The plasma below is one fragment shader over a fullscreen rectangle.
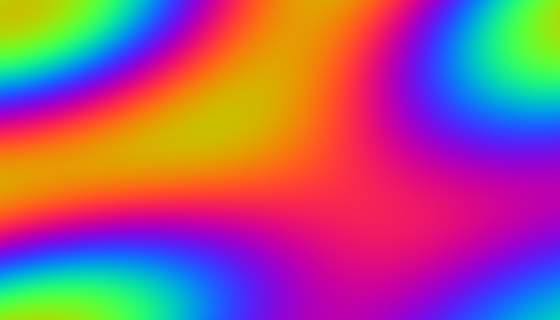
There are two ways to make one. The portable way is to write the shader once in GLSL, compile it offline to a SPIR-V blob and an MSL blob, and hand both to newShader; the engine picks the one the running backend wants, so the same program draws on Metal and Vulkan alike. The shader example does exactly this, and the comment at the top of its plasma.frag shows the two compile commands (glslc, then shadercross). The GLSL receives vUV at location 0 and vColor at location 1 from the vertex stage, a sampler in set 2, and, when you ask for one, a uniform buffer in set 3.
const spv = staticRead("plasma.spv")
const msl = staticRead("plasma.metal")
let effect = n2d.newShader(spv, msl, uniformFloats = 4) # (1)!

n2d.draw = proc(nim2d: Nim2d) =
  effect.send([time.float32, w, h, 0]) # (2)!
  nim2d.setShader(effect)              # (3)!
  nim2d.rectangle(0, 0, w, h, true)    # (4)!
  nim2d.setShader()                    # (5)!
- Make the shader, reserving room for four uniform floats.
- Fill the uniform with the time and the frame size.
- Turn the shader on.
- Draw a fullscreen rectangle so every pixel runs it.
- Turn the shader back off.
The direct way, if you only care about Metal, is to pass Metal Shading Language source. The fragment function is named frag and a preamble is added for you, so you write just the function. It receives in.uv and in.color from the vertex, in.position.xy as the pixel position, the current texture as tex (a white pixel when you're drawing shapes), and the uniform as u.
const fragSrc = """
fragment float4 frag(VSOutput in [[stage_in]],
                     texture2d<float> tex [[texture(0)]],
                     sampler smp [[sampler(0)]],
                     constant float4& u [[buffer(0)]]) {
  float t = u.x;
  return float4(0.5 + 0.5 * sin(t), in.uv.x, in.uv.y, 1.0) * in.color;
}
"""

let effect = n2d.newShader(fragSrc, uniformFloats = 4)
One thing to know: shapes carry texture coordinates of zero, so a shader that should vary across a fullscreen shape wants the pixel position (in.position.xy in MSL, gl_FragCoord.xy in GLSL) rather than the texture coordinates. The texture coordinates are the right tool when shading an image or a canvas.